Monday, September 17, 2012

Coffee or Tea?

Hot or iced?

Sweet or unsweet?

Being a professional barista, I ask these questions all the time. Sometimes it's hard to decide. I love it all: Hot, iced, sweet, unsweet, frozen, on the rocks, coffee or tea. But now I have a new question I can ask...

Dessert or Snack?

 
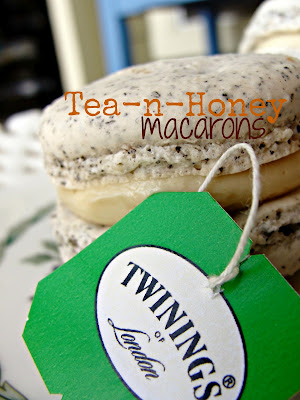
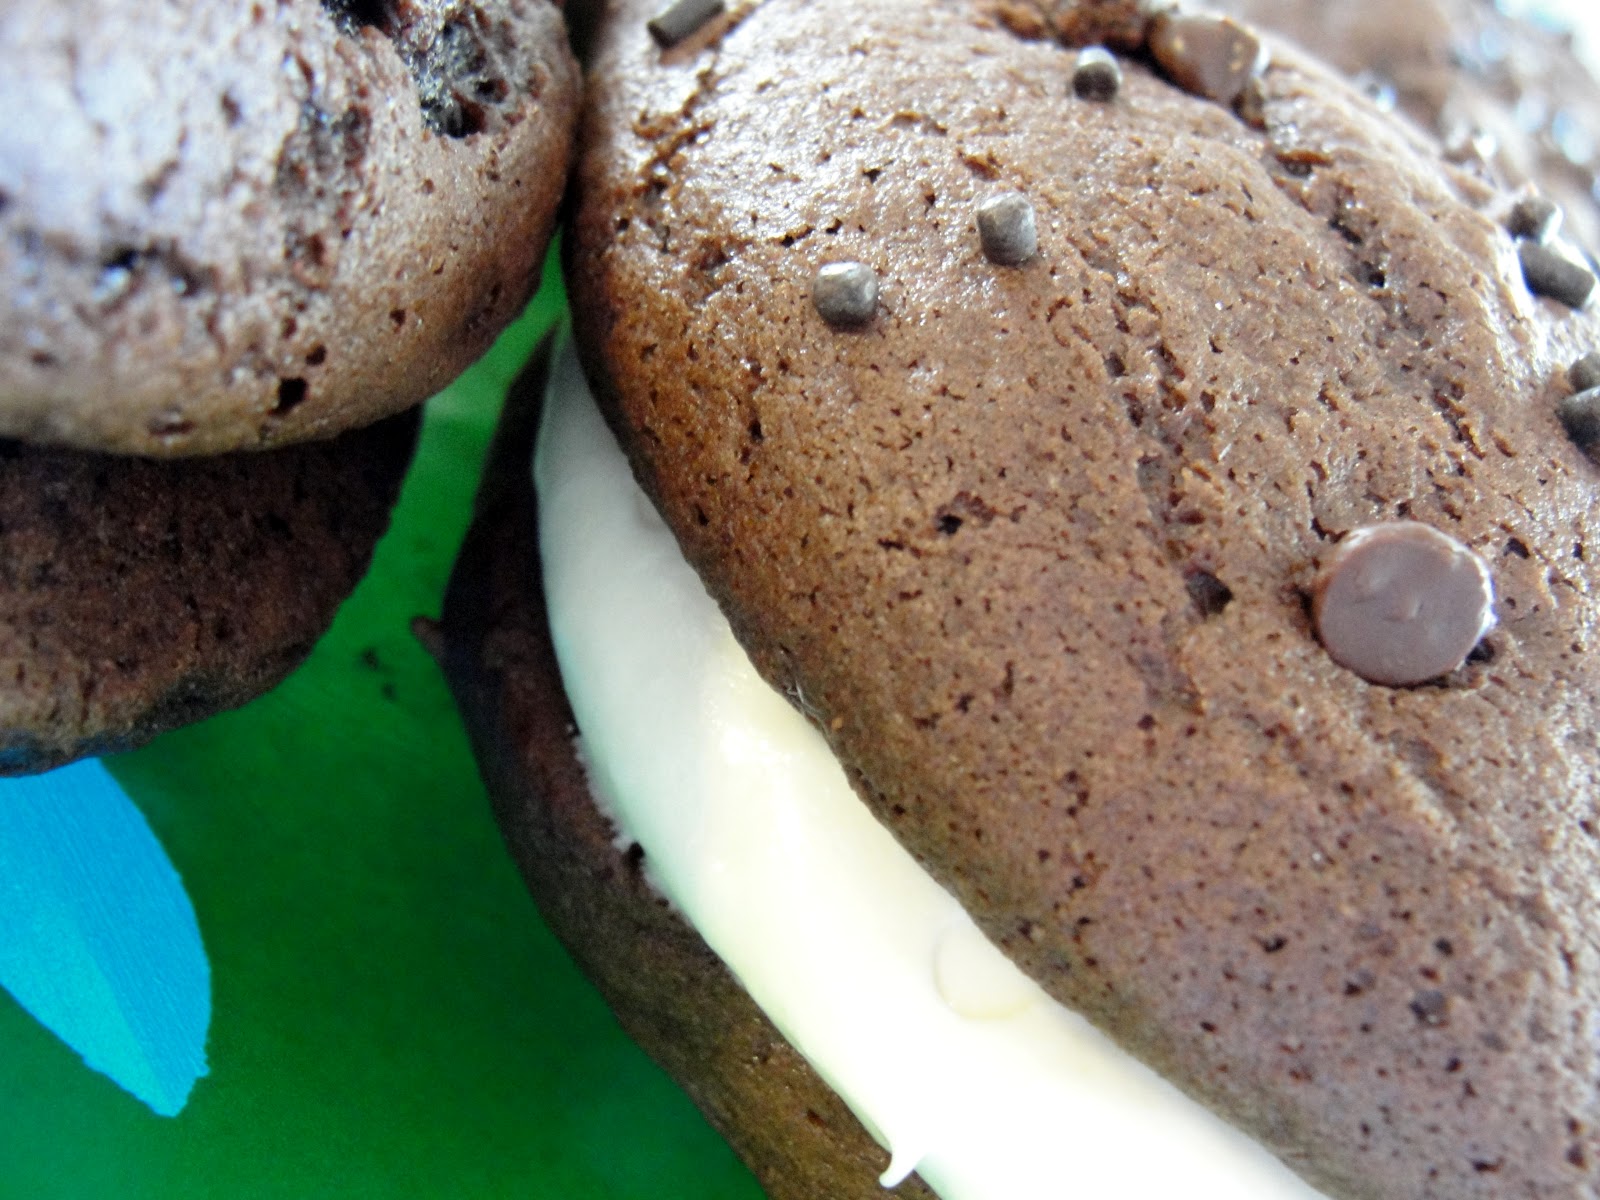
Hazelnut Mocha or Tea with Honey?

Mmm... Nutella. You know that fantastically addictive chocolate hazelnut spread? Pair that with a crispy, chewy coffee flavored macaron cookie... Pure delight.


But who doesn't like tea with honey? These used a combination of lapsang souchong (a smoked black tea) and breakfast tea. Filled with a sweet, custard-like honey buttercream, these macarons are dangerously delicious.

Buttercream 101

Before I get too far into these macarons, let's take a moment and learn about buttercream. 

When I first came across this recipe for honey buttercream, I had to research if it was possible. I had never heard of cooking egg yolks and then beating in butter. I quickly learned there are five types of buttercream: 

     American - a combination of powdered sugar, butter, sometimes shortening and flavor

     Swiss - egg whites and sugar that are heated in a double boiler to 140-160 F, then whipped into a meringue before adding butter

     Italian - sugar syrup heated to the soft ball stage and then drizzled into whipped egg whites before adding butter

     French - made the same way as Italian, except using egg yolks instead of whites 

     German (Bavarian) - egg yolks and sugar cooked until thickened, allowed to cool and then beaten with butter.

American buttercream is by far the sweetest of these. I've never tried a French buttercream, but the German is extremely rich, creamy and super spreadable. I still love my Swiss Meringue, but I might have found a new filling favorite. 

I've come across recipes for instant pudding in frosting, but I want to try a cook and serve pudding mix as a base to German buttercream. I'm going to apply my scientific method and research this. I'll let y'all know how it works out. 

Now back to macarons... 


I easily modified my macaron recipe for the Hazelnut Mocha Macarons by adding 2 tablespoons of instant coffee powder to the almond/powdered sugar mix. I piped them into 1 inch cookies and filled with a simple smear of Nutella.


For the Tea-n-Honey Macarons, I added the tea from three single cup servings of tea to the almond mix. I followed this recipe without any adaptions for the honey buttercream. 


I made the coffee macarons first and decided that the tea macarons needed to be a bit larger. These are roughly 1 1/2 to 2 inches across. (I really didn't measure and they've all been gobbled up by now) The macaron batter made exactly 30 cookies (that's 15 sandwiches). I was able to generously fill all the cookies and only had about a quarter cup of honey buttercream left over. 


So get out there and caffeinate your dessert. Or snack. Really it just depends on when you attack these babies...
 here's to choices!
bleu
 

Monday, July 2, 2012

Pineapple Cake and Independence Day

Who loves Pineapple Upside Down Cake?

This iconic treat has always been one of my favorites. Truly, I love the little maraschino cherry and candied pineapple more than the cake.  And we all know how much I prefer to make tiny portable cakes over big fork-n-knifers.  I also prefer to have my cakes in handy dandy paper wrappers.

This is my version. Another classic combination, gone bleu...


Pineapple Right-side Up Cupcakes...


Full of all that you love (yep, that's a candied pineapple center) and topped with my newest favorite Swiss meringue buttercream (and a maraschino cherry of course).

This cake combined a traditional butter cake with my great-grandmother's Pineapple Cake recipe. Granny's cake used a box mix, this filling and her 7 Minute Frosting. I really, really wanted to put a 7 Minute Frosting on these cakes, but I wasn't even going to whisk it up by hand (for real, I don't own a hand held mixer). I repeat that I'm a sugar addict. Seven Minute Frosting is SWEET. But delicious. But sweet, sweet, sweet... So as much as I want to try it that way, I think we should stick with the Swiss meringue buttercream.

This was also the first time I've ever baked a cake that used margarine. I've used margarine in cookies and things, but never cake. I'm such a huge fan of eating creamed butter and sugar straight out of the mixer that I try to find ways to make food with those two ingredients. (Wait... did I really just admit that to all of you? Meh. You already know I'm an addict...) I want to try this cake with butter, but know that even with margarine, this cake was super moist, had a gentle crumb, and was really flavorful.

So, enough with the chit-chat... On with the cake!


Pineapple Right-side Up Cupcakes
adapted from my great-grandmother, Atha Taylor's personal collection of recipes

For the cake:
2 1/3 cup all purpose flour
1 tablespoon baking powder
1 teaspoon salt
1 20 ounce can crushed pineapple in juice (*directions below)
1 cup milk (slightly less)
2/3 cup margarine
1 2/3 cup granulated sugar
3 large eggs

1. Prepare canned pineapple. Drain and reserve the juice. Remove 1 cup of drained pineapple for cake. Keep the remaining pineapple with 1/2 cup juice for the filling. Put the remaining juice  in a 2 cup measuring cup and add milk to total 1 1/4 cup.
2. Combine flour, baking powder and salt in a medium bowl.
3. Cream margarine and sugar until light and fluffy. Add eggs, one at a time, mixing well between additions. Add flour in three additions, alternating with milk, starting and ending with flour.
4. Scrape bowl well and add pineapple.
5. Fill paper liners about half full and if you're lucky, pop 'em into one of these:
(this was one of my Christmas presents... CupCake Genius) Bake at 350 F for 20-23 minutes. Allow to cool completely before filling.

For the filling:
Reserved crushed pineapple and juice
3/4 cup brown sugar 

1. In a small sauce pan, combine pineapple and sugar. Cook over medium heat until pineapple is "candied" -- thick sauce, clear fruit. 

2. Remove from heat. Allow to cool before using.

To assemble:
 Create a hole in the center of each cupcake using a paring knife or apple corer. Fill with about 1/2 teaspoon of the candied pineapple. Top with a swirl of brown sugar Swiss meringue buttercream, a maraschino cherry and a bit of pineapple.


Enjoy this retro favorite!

And Happy Fourth of July!!
bleu

Monday, June 25, 2012

Beer, Bacon and Cupcakes

I have a strange fascination with trying to put my favorite flavors into a cupcake:

I've made a Honey-Almond Cupcake just because I loved the scent of a Honey Almond Latte at work.

I've combined jalapeno with lime in a delicious but not too savory cake...

Rich milk Chocolate with Fresh Strawberry Buttercream (and jam center)...

Spice cake with Apple filling and Cinnamon Buttercream...

I just created my ultimate combination though:  Guinness and Bacon. Oh, and Brown Sugar Swiss Meringue Buttercream. 
Guinness Spice Cakes with Brown Sugar Buttercream and Candied Bacon

I think most people have heard of a chocolate stout cake. I love chocolate, but I wanted a cake that didn't hide the wonderful taste of Guinness. Guinness is always described as having chocolate-y or coffee-y flavors. I'm not paid for my opinion, but I have always tasted a sweetness and rich, vanilla notes in a Guinness. I thought it would go perfect with spice cake. 

Oh, boy, did it ever!! 


These cakes have all the great flavors of the best winter cake paired with the light, creaminess of a pint of Guinness, complete with a mild yeast-like bitterness on the back of the tongue. Top it with the a dark brown sugar buttercream and candied bacon, it's love at first bite.

These cakes super easy to make. So easy it's almost intimidating. The hardest part is waiting for them to cool. But don't stress that too much-- melty brown sugar, butter and bacon on a super moist spice cake... Is anything wrong with that?


Guinness Spice Cakes with Brown Sugar Buttercream and Candied Bacon
(uses a spin-off of the famous Weight Watchers Diet Soda Cake. Frosting from Martha Stewart)

For the cupcakes: (YIELD 14 CUPCAKES)
1 box spice cake mix
1 bottle or can of Guinness Draught (you need 10 fl oz, not including the head)

(this is so easy, I almost feel like I'm cheating you...)
1. Empty cake mix into a medium bowl and use a whisk or your fingers to break up any big lumps of mix.
2. Pour the Guinness into a glass measuring cup, using the side to keep the head to a minimum. Canned Guinness Draught uses a widget, so you must measure it first or you will end up with a minor explosion of Guinness in the bowl, but bottled draught can be just poured in slowly. (I just kept a sip or two for myself out of the 11.2 fl oz draught bottle)
3. Mix thoroughly, but some lumps will remain. 
4. Dish into paper lined cups and bake for about 18 minutes in a 350 F oven.
5. Allow to cool completely before frosting.

For the bacon:
2 strips of thin sliced, plain bacon
4 tablespoons of brown sugar
spices to taste (optional)

1. Preheat oven to 400 F. Place a wire cooling rack on a sheet pan lined with foil. 
2. Divide the brown sugar in half and press onto one side of the bacon. Lay bacon sugar side up on wire rack.
3. Bake for 20 minutes, ignoring the burning smell of sugar, but checking for any flare-ups. If the bacon is crispy enough, pull it now. If not, let it bake for 5 minutes at a time until crispy.
4. Allow to cool completely before giving it a rough chop.

For the frosting: (YIELD 5 CUPS)
5 large egg whites 
1 2/3 cups packed dark-brown sugar 
1/2 teaspoon salt 
4 sticks (2 cups) unsalted butter, room temperature

1. Put egg whites, sugar, and salt into a heatproof bowl set over a pan of simmering water. Whisk until mixture registers 150 degrees, about 4 minutes.
2. Remove from heat and attach to stand mixer fitted with whisk attachment. Beat on high speed until stiff, glossy peaks form. Continue to mix on medium until the bowl is no longer warm.
3. Replace the whisk with the paddle attachment. Add butter slowly on medium-low speed.  Beat until frosting is smooth and glossy, 3 to 5 minutes. 

Buttercream can be refrigerated airtight for up to 3 days OR frozen for 6 weeks; bring to room temperature, and beat before using.


Allow a generous swirl of this frosting... it's so tasty, you're going to want extra. And trust me, that salty goodness is PERFECT with a Guinness Spice Cake and Bacon...


Cheers!!
bleu

Friday, April 20, 2012

I heart Spring Macarons!

This Easter, I was asked to make some treats. I love making sweets for friends, but my family doesn't always get to sample my eats. 

Mom requested sugar-free cupcakes... preferably lime.

My Aunt wanted something gluten-free.

I wanted to make something colorful.


I'll post some other day about the lime cupcakes. Today is all about these delicious macarons!

Now, macarons are not to be confused with macaroons. I'm talking about the delicious french pastry, not those coconuty weird things that everyone hates. These are crispy on the outside, cake-like on the inside and just sweet enough to make you want more.

I researched for ages before finally making a macaron. Every recipe I found used weights to keep the liquid to dry ratio consistent. I bake. A lot. But I do not own a scale. I know, they aren't super expensive. I'm just too lazy to buy one.

I finally found one recipe that was by volume. I also found quite a few troubleshooting guides online that help with any questions that come up. This one is my favorite. I'm not going to try to help with all of the problems that come up while making macarons-- I'm just not qualified. I will let you know my problems as I go though the recipe.


To begin, I doubled the basic recipe, then divided it in thirds. I couldn't decide how much to make, but a full batch seemed like too much and this is where I ended up. I used a store bought lemon curd and raspberry jam. I used my vanilla bean buttercream that I had stored in the freezer.


These things are so tasty, it won't matter if they're pretty or not. To help make them as pretty as possible, use a pencil and an inch circle to mark the back of the parchment paper. It will give you something to aim for while piping those cookies. Make sure to set up a large piping bag with a 1/2 inch (1 cm) tip.


Basic Macarons
adapted from A La Cuisine 

Ingredients
1 ¼ cups powdered sugar
4 oz (1 cup) almond flour or finely ground almonds (blanched, slivered - skinless)
¼ cup plus 2 tbsps egg whites at room temperature
pinch of salt
¼ cup granulated sugar

Method
1. Use a pencil to draw 1-inch circles about 2 inches apart on parchment paper. Flip each sheet over and place each sheet on a baking sheet.
2. Mix the almonds and icing powdered sugar in a food processor. Sifting it after this step makes for smoother cookies, but won't alter the taste.
3. In a large clean, dry bowl whip egg whites with salt on medium speed until foamy. Increase the speed to high and gradually add granulated sugar. Continue to whip to stiff peaks – the whites should be firm and shiny.
4. With a flexible spatula, gently fold in almond/sugar mixture into egg whites until completely incorporated. The mixture should be shiny and ‘flow like magma.’ (thick, gooey and as few strokes as possible) When small peaks dissolve to a flat surface, stop mixing. Folding in the almonds is the weirdest part. Too much folding and the cookies run and loose shape (or turn out hollow), but they still puff and make delicious cookies.
5. Fit a piping bag with a 1/2-inch (1 cm) round tip. Pipe the batter onto the baking sheets, in the previously drawn circles. Tap the underside of the baking sheet to remove air bubbles. Let dry at room temperature for half an hour or so to allow skins to form. The cookies should lose most of their shine, but it might not happen if it is too humid.
6. Bake in a 325F oven for 10 to 11 minutes, rotating pan halfway through baking. Some days take longer to bake than others, so test a cookie by trying to move it on the parchment. If it sticks, smears, or squishes, keep baking checking every 2 minutes.
7. Remove macarons from oven and transfer parchment to a cooling rack. When cool, slide a metal offset spatula or pairing knife underneath the macaron to remove from parchment.

Orange Macarons

I added the zest of an orange to the almonds in the food processor. I also added a couple of drops of orange extract to increase the orange scent and a ton of orange food gel.

The filling is a chocolate ganache (equal parts chocolate and heavy cream) that I whipped in the mixer. I added some extra cream to make it the right consistency for piping.


Raspberry Macarons

These cookies actually have no flavor. I just added a few drops of red food color.

The filling is raspberry jam. I used 1/4 cup of jelly and heated it with a package of gelatin and chilled it to firm it up. I wanted it to stay in the middle of the cookies. Using a small star tip pipe a ring of frosting then fill the center with raspberry.
Lemon Macarons

I added the zest of 3 lemons to these cookies. And a lot of yellow food gel. I piped and filled them the same way as the raspberry, just using lemon curd straight from the jar. 


Macarons are best when allowed to rest (or cure) for 24 hours. Stick 'em in the fridge, but bring them to room temp before eating. If they last that long, store for them an airtight container.

These cookies will make your week. So, hurry up and go make some. And enjoy them tomorrow. ;-)

we heart macarons,
bleu

Friday, March 30, 2012

A Sugar Addict's Love Affair

Hi. My name is Bleu and I'm addicted to sugar. 

Like so addicted that it's one of the first things I think about when I wake up. And also one of the last things I think of before sleeping.

And like so addicted that I spend most of my time researching recipes, testing recipes and EATING recipes in which sugar is in the first three ingredients. And usually right next to butter and flour.

I wish I could blame this compulsion to play with sugar on someone else (family, friends, readers), but deep down I know who to blame. Correction: what to blame...

Oh, yeah. The Whoopie Pie. That perfect ratio between moist cake-y goodness and sweet creamy bliss. The perfect little pocket cake.


These Amish treats lead back to the days when the women would send them with farmers as a lunch treat. When they would find them in their lunches, they would shout "Whoopie!"  

I know I would shout if I found one of these delicious treats in my lunch. 


Just look at all that yummy, gooey, chocolatey perfection.


Moist chocolate cake.


Marshmallow cream filling.


And so easy to make, you have no excuses not to join my sugar addiction.


Whoopie Pies
adapted from Betty Crocker

Ingredients
Cookies:
1 box devil's food cake mix
1/2 cup water
1/2 cup vegetable oil
3 large eggs
2 tablespoons brewed coffee, room temperature
1 box (4-serving size) chocolate instant pudding mix 
Filling:
1 cup (2 sticks) butter, room temperature
2 cups marshmallow cream
1 1/2 cups powdered sugar
1-2 teaspoons vanilla extract

Method
For Cookies:
1. Preheat oven to 350 F. Line baking sheets with parchment paper.  
2. To avoid a mixer, combine water, oil, coffee and eggs in a small bowl until well combined. Add to dry mixes using a wooden spoon. Stir by hand approximately 2 minutes. Mix will be VERY thick and requires lots of muscle to mix. (Alternately, you can just combine everything with an electric mixer for about a minute)
3. Using a disher, scoop approximately 1/4 cupfuls onto baking sheets two inches apart. (I fit 6 cookies using true half sheet pans). Flatten slightly with the back of a clean spoon.
4. Bake for 13-16 minutes or until set. Allow to cool on pan for 2 minutes before removing to cooling rack.
For Filling:
1. In bowl of stand mixer, combine butter and marshmallow cream until light and fluffy- about 2 minutes.
2. Add powdered sugar and vanilla. Mix on low to combine, then on high for another 2 minutes.

To assemble:

Using the same disher, scoop filling onto center of one cookie and fit another cookie on top, pressing slightly. 

It's going to look like too much filling, but trust the expert...

You're going to love this sugar rush.


Whoopie!
bleu

Monday, March 26, 2012

Baking with Ice Cream

I LOVE ice cream. 

I mean with the full on "I could survive on nothing but ice cream and be a very happy (albeit somewhat rotund) camper!" love. 

It's hot in Texas. Some people hate that, some love it. I'm more of the "I'll tolerate it" Texan. Mostly, I find it's just more of an excuse to eat ice cream year round. During the winter, one of my favorite desserts is a big bowl of vanilla ice cream with hot caramel sauce.  And a blanket to keep me warm while I chow down.

But that chill can get me no longer! I have found a way to harness the deliciousness of ice cream with out ANY of the chill. I introduce to you, Toffee Crunch Ice Cream BREAD.


Notice how I called that "bread" and not "cake"? There is a method to my madness, I swear.

When I first came across this page, my interest was piqued. Okay, I shouldn't lie... I was obsessed with finding a chance to make it. I didn't waste much time buying ice cream. I went for an easy favorite, Toffee Crunch. It's a simple ice cream with a bit of caramel swirled through it and chunks of chocolate.

I had read that it wasn't sweet, but not really believing that, I figured I'd make it really decadent and use some homemade caramel sauce and some extra mini chocolate chips to liven it up.


After it was all baked, slightly cooled on my table, I had to dive in. I was really surprised. I didn't believe it, but this is NOT a super sweet bread.


It's texture is reminiscent of a pound cake or pudding cake, but it's chewy like bread. And still warm... with a smear of butter... It's perfect!


 You have to try this!


{insert flavor here} Ice Cream Bread
recipe from In Katrina's Kitchen

Ingredients
1.5 quart of your favorite ice cream (full fat! no skimping on calories!)
3 cups self rising flour 
Mix-ins of your choice

Method
1. Preheat oven to 350 F.  Liberally grease a 12 cup Bundt pan. (It will fit in a 9 cup pan- just know that it will rise over the top.)
2. Soften the ice cream at room temperature for 10-15 minutes.
3. Using a stand mixer, combine ice cream with flour. Mix for 2-3 minutes to get the chewy bread texture.
4. Add any mix-ins and fill Bundt pan. Smooth top with a spatula. Bake for 35-45 minutes.
5. Allow to cool slightly in pan, then invert, and allow to cool on a baking rack.

Best eaten day baked, but wrap leftovers well and refrigerate to keep longer.


oh, please try this!

bleu

Wednesday, March 7, 2012

Peanut Butter Birthday Overload

Birthdays always require dessert.

Sometimes it's a colorful dessert.

Sometimes it's a simple dessert.

But sometimes... sometimes it requires a Peanut Butter Overload.


These cakes might sound really complicated but they really aren't. I made two batches (without doubling the recipe), filled and frosted them in about 4 hours. I ended up with almost 5 dozen cupcakes. But don't worry, you will want extra of these beauties. 

I admit I'm not always a "from scratch" baker. These cakes start with a doctored up cake mix. I decided to go this route because I'm still hunting for the PERFECT chocolate cake recipe. I needed these cakes to be moist and hold up for a day or two before delivering them.


Peanut Butter Chip Chocolate Cupcakes with Peanut Butter Cookie Dough Truffle Filling and Peanut Butter Buttercream

Part I: Peanut Butter Cookie Dough Truffle Filling
adapted from Crazy for Crust

Ingredients 
1 cup creamy peanut butter
3/4 cup granulated sugar
1/4 teaspoon pure vanilla extract
1 tablespoon milk

Method
Mix everything together until smooth and dough-like. Roll teaspoon size balls between your palms. Place on a cookie sheet and chill in refrigerator until needed in Part II.

Yield approx 5 dozen teaspoon sized balls


Part II: Peanut Butter Chip Chocolate Cupcakes
unknown origins, used by many

Ingredients
1 package Devil's Food cake mix (with or without pudding in the mix)
1 package instant chocolate pudding
1 cup sour cream
1 cup vegetable oil
4 large eggs
1/2 cup warm water
1 cup semi-sweet mini chocolate chips
3/4 cup peanut butter chips

Method
Preheat oven to 350 F. Line muffin pans with paper liners.
1. In bowl, combine cake mix and pudding mix. 
2. In separate bowl, combine remaining ingredients (minus chips). Whisk until smooth and no longer separated (3).
3. Add to dry ingredients and combine until just mixed, about 30 seconds. Increase speed to medium and stir for an additional 2 minutes.
4. Scrape bowl sides and stir in chocolate chips and peanut butter chips.
5. Using a disher (#16 or #20)for even cupcakes, scoop into prepared pans. In the center of each cupcake, place one truffle (from Part I). Push into cupcake until at least 3/4 covered in batter. Drop pan on counter to settle the truffle and help remove any large air bubbles.
6. Bake on middle rack for 15-18 minutes. Check with a toothpick being careful not to insert into the truffle.
7. Allow to cool for 2 minutes in pan before inverting and allowing to cool on wire racks.
yield approx 18-20 cupcakes based on size of disher used.


Part III: Peanut Butter Buttercream
adapted from My Baking Addiction

Ingredients
3 sticks (1.5 cups) butter, room temp
1 cup creamy peanut butter
1 tablespoon pure vanilla extract
2 pounds powdered sugar, sifted
6-8 tablespoons heavy cream

Method
1. In bowl of stand mixer, combine butter and peanut butter on medium speed until pale and creamy (2).
2. Add entire amount of sugar. Mix on low (it will create a dust cloud if you go too fast) until combined (3).
3. Add vanilla and 4 tablespoons cream. Turn speed to medium and mix for 1 minute. 
4. Add more cream, tablespoon at a time, until desired consistency. 
5. Beat on high for 4 minutes. Put in a piping bag fitted with a large star tip (Ateco 808).
6. Pipe a generous swirl of frosting on each cake. If using sprinkles, make sure to put them on quickly as this frosting does crust.


This little baby cake is really a Reese's Peanut Butter Cup Miniature topped with a swirl of Peanut Butter Buttercream. I <3 edible toppers.

Happy Baking!

Bleu