Tuesday, November 5, 2013

Pumpkin Coffee Cake Muffins

I know this is a little late to the pumpkin party. But it’s okay. Because you love pumpkin.
Just like I love coffee cake. Oh, yeah.

I love anything with streusel topping and cinnamon. Streusel makes everything better. 

These lovely muffins are going to be great for all those Black Friday midnight shoppers! Pumpkin is high in fiber, potassium rich, and an excellent source of vitamins. So these little babies will get you moving and keep you going! 


And now on to the recipe!

I kinda blog-stalk a lot of people. It’s a sort of addiction. I get an idea for a new cake and Google. I also tend to base my clicking on Google Images. (You eat with your eyes first!) I got this recipe from Sally’s Baking Addiction. Sally has been part of the food blog scene for a while. I’m sure if you have ever tried to research a new recipe, you have come across her gorgeous photos and recipes.

I modified her recipe a bit based on what I had available. I used light brown sugar and substituted molasses for the maple syrup. (It’s way too expensive to buy real maple around here.) I also ignored the glaze on the recipe and made my own.

I always have frosting in my freezer. I have yet to master the correct yield for a batch of cupcakes and frosting. I keep adding to my stash because they make great quick fillings for macarons. I pulled out about a cup of cream cheese frosting, added a bit of half and half to thin it and a teaspoon of cinnamon.

These are actually egg-less and super easy to translate into a vegan muffin by using dairy free milk and margarine in the streusel.

See? I can make healthy eats too. Just don’t eat half a dozen. Like I can.


Happy Pumpkin-ing!
bleu

Thursday, October 10, 2013

Chocolate Toffee Crunch Cake

I wanted to bake today. I know I’ve been slacking on the whole bake-n-blog scene. I needed to try something new (but I didn’t want to go to the store for any ingredients).

My pantry isn’t super stocked at this time. I have the basics and cocoa. So chocolate cake it is.

But of course I don’t want just plain chocolate cake… I wanted toffee chocolate cake.


So this cake is mostly an oops. I was hoping for it to turn out more like an upside down cake with the gooey caramel top once it was flipped.

As you can see, it didn’t really turn out that way.


However, this cake was way too tasty to waste. Those little crunchy bits of toffee on top are better than Heath bar pieces.

This cake is delicious when served with some ice cream or (if you’re lucky) crème anglaise


And for the cheap (or lazy) fans, if you really want to try it with crème anglaise but don’t want work for it, melt some ice cream. I’m told it’s not an exact replacement, but it works for me.

You definitely need to make this. On my next attempt I might mix some honey or corn syrup with the caramel. I know the juices that are in the fruit on an upside down cake have to play some role on the actual caramel. I imagine that using some sort of liquid sugar with the brown sugar will help keep the sugar from crystallizing so much.


Chocolate Toffee Crunch Cake

(recipe loosely based on Martha Stewart cake)

Ingredients:
1/4 cup butter, melted
1/2 cup brown sugar
1 1/2 cups all-purpose flour
1 cup sugar
3 tablespoons unsweetened cocoa powder
1 teaspoon baking soda
1/2 teaspoon coarse salt
6 tablespoons vegetable oil
1 teaspoon pure vanilla extract
1 tablespoon white vinegar
1 cup cold water
1. Preheat oven to 350 degrees.
2. In an 8 in baking pan (square or round), combine melted butter and brown sugar. Spread evenly on bottom of pan and set aside.
3. In medium mixing bowl, combine the dry ingredients with a whisk. Add all wet ingredients at once and combine.
4. Carefully pour over the brown sugar mixture and spread evenly.
5. Bake 30-35 minutes or until done. Remove from heat and allow to cool in pan 8-10 minutes.
6. Invert onto cake plate, but leave the pan on the cake until it releases.
7. Remove pan and panic (or cry if that’s your thing). Pause. Try to come up with a plan. Grab a spoon or firm plastic pastry scraper and use it to scrape all the great gooey cake and crispy toffee bits onto the top of your cake.
8. Cut into 9 pieces and serve warm or at room temperature.

I always have a fan club. Sometimes it’s my friends and taste-testers. Sometimes it’s the strange people I call family. Most of the time, it’s just one of the kids…


Best Oops Cake Ever,

bleu


Monday, August 19, 2013

Funfetti Revisted

Occasionally in your life, you come to the realization that work sucks. 

Not just the usual “I hate my job” sucks, but the deep down, this-job-is-stealing-my-soul-and-feeding-it-to-the-bears sucks. My Zoo career was getting there (kind of literally since I made bear food…), but I got out before too much damage was done.

I cared too much. I had too much pride in my job, in my product, that I couldn’t separate my expectations of myself from what I expected of others. My inability to deal was causing major problems between our crew and within myself.

Luckily, I had some great co-workers at the Zoo (hello MR!). One co-worker gave me some great advice back in the day. She probably only prolonged my inevitable Zoo career downfall, but at the time, her advice saved my sanity.

When I found out she was also saying good bye to the Zoo, I knew I needed to make her something. (I don’t care what you say—food always makes the perfect gift!)

I resorted to another adage a friend of mine once gave me:

“When in doubt, Add SPRINKLES!”


I know... I’ve made Funfetti cupcakes before. But I’ve not made these cupcakes:


My go-to vanilla cake with a cup of rainbow jimmies baked right in. Covered with vanilla Swiss meringue buttercream and every sprinkle I had in the house, these little treats satisfy every craving. 


And yes, I have a sprinkle addiction. And no, it’s not my fault. I just really like to have some sprinkle options available anytime I bake. 

And it’s really not my fault that I only use the pink sprinkles at Valentine's or that sometimes sprinkles come in humongous jars. I like variety.

And sprinkles.


 Trust me. Everything’s better with sprinkles.
bleu
  
Oh, and that excellent advice I received… I still use it today. ;-)

Sunday, July 28, 2013

Aloha and Chocolate Coconut Cupcakes

At the coffee shop, we’re family. Dysfunctional to the max, but family no less.

I think it’s from dealing with all the crazies ordering onerous drinks (Who really drinks a double tall, almond milk, extra dry, sugar-free hazelnut cappuccino with the shots on top?). Or maybe because we tend to be baristas and babysitters in one fine location (The mall is the perfect daycare, right?).

No matter the cause of our kinship, we are siblings. And when little sister decides to move back to Hawaii, we hold no grudge. (Well, not a big one…) Instead, we combine two of her favorite flavors and bake.


Oh, yeah. Chocolate and Coconut. So tasty.

These chocolate cupcakes are bursting with coconut flavor. Coconut milk, coconut oil, coconut extract… 


Oh, my! They’re filled too?!  

Of course! That’s a snack size Mounds bar—dark chocolate coated coconut candy. So moist, chewy coconut-y goodness, baked in the middle of a super easy coconut chocolate cupcake and topped with a delicious coconut buttercream frosting.

Yes, PLEASE! 


I used my go-to chocolate cake recipe. It usually has buttermilk, but I substituted unsweetened coconut milk and added a 1/2 teaspoon of coconut extract. I happen to love the scent and taste of coconut more than the texture. You can add flaked coconut instead of extract, but I would recommend no more than 1/2 a cup, chopped fine. After filling the cupcake liners about two-thirds full, I dropped half a snack size mounds on top. (Next time, I won’t push it into the cake… I think that’s why they sank to the bottom.)

I grew up loving Wilton Buttercream. It’s sweet, but so easy to make and flavor. To make vegan buttercream, you substitute the butter with vegetable shortening (making sure to use vegan sugar and a vegan milk substitute).

Obviously, these cakes are NOT vegan. I had come across a vegan buttercream at some point in my research that used coconut oil and had been dying to have an occasion to use it. I’m making coconut cupcakes, so why not try a coconut oil frosting? Excellent decision. I used the remainder of the unsweetened coconut milk to help with consistency and added a splash of coconut extract. 
 

Coconut Buttercream Frosting
(Adaption based on information gathered here)
                         
Ingredients:
1 cup coconut oil*
4 cups powdered sugar
1/2 teaspoon coconut extract
1 teaspoon vanilla extract
2-4 tablespoons unsweetened coconut milk

1. Whip coconut oil on medium speed until fluffy.
2. Add powdered sugar and mix on medium-high for 2 minutes.
3. Add extracts and mix. Add milk to desired consistency.
4. Use quickly; this frosting stiffens as it sets.

*I used refined coconut oil. I’ve since read that unrefined might have stayed a bit more solid at room temperature.

Aloha little sister, Ashley. Your Texas Nordy’s miss you.
But mostly, we’re all just jealous.
bleu

Wednesday, June 19, 2013

Edible Cupcake Decorations (Using Wilton Candy Clay)

So it’s just one more excuse. But I swear this time it’s a worthy excuse…

As of April 19th, I officially became Mrs. Bleu. 
with the best man, Tsavo, in the background
We had a terrific ceremony at the Fort Worth Zoo. A little bit flash mob. A little bit geeky. And a whole lot of love.


But the real star of any family shindig is always the food. We’re pretty big fans of eating around here. Of course we took our family to eat dinner.

However, weddings are really about the cake. Don’t get me wrong—the bride and groom are pretty important. But if you’re celebrating with your friends, you already know they love each other… So don’t lie, you’re there for the cake.

Naturally, I made our cakes. Nothing fancy, just some vanilla cakes with vanilla buttercream and chocolate cakes with dark chocolate frosting.  What made them fancy enough for our family were the decorations.


My aunt brought me this Rycraft Cookie Stamp  after she learned about us getting married in the zoo. We knew we were doing the ceremony in front of the lion exhibit. I knew we would be doing cupcakes (not cookies), but I also knew I just had to find a way to use it. 


I started hunting for some way to make a cupcake topper and I wanted it to be completely edible. I thought about just making some cookies, but I’m really not a cookie maker. I always burn them or make them tasteless. I ended up looking for tips on using gum paste and fondant, thinking that I could just buy a tub of the stuff and make it work.

Have you eaten any of those tubs of fondant? They taste like… Well, they taste like nothing. I’m not a fan. But everyone uses fondant. (I know that homemade marshmallow fondant is delicious, but I’m too lazy to make it.)

Then this post by Sweetapolita gave me an idea: Wilton Candy Clay medallions.

WiltonCandy Clay is seriously easy to make. Like two ingredients and a microwave easy. It works like modeling chocolate (at least that’s how it’s described). You mix it up, let it set, and then roll it/mold it how you want. The hard part is picking a color of Candy Melts to use.

We didn’t really set a color scheme for our wedding. I wore teal. I made gold, grey and ivory flowers. I used dark coral for an accent. Do they even make candy melts in those colors? Did I really need five shades of medallions? I obsessed over the color to use for ages. And when I finally decided what colors to use, we headed to the store. Then I found these…


Oh, yeah. They come in three delicious flavors: key lime, orange crème, raspberry sherbet. Just add corn syrup and hello flavored modeling chocolate!

I actually used about a tablespoon less corn syrup than the recipe calls for. I was trying to make sure that it was going to produce a firm enough ball of chocolate. I probably could have used even less. After letting the chocolate set overnight, I portioned it into 10 gram balls. (I was being a bit of a perfectionist.) Using my seasoned Rycraft cookie stamp (dusted in a bit of cornstarch), I simply pressed my way to chocolate medallion bliss.


I allowed the medallions to sit in a chilled box until right before serving. Even though it was chilly for most of the day, I was afraid the buttercream might make them sweat or they would get too soft. I have no clue if this really happens; I only think it might have happened.

The lions were a big hit. We shared them with family at the restaurant and later with friends at a bar. Everyone loved them.

 
Happy two month anniversary to the weirdo I married!
the new and even weirder,
mrs. bleu

Saturday, March 9, 2013

Salted Caramel Chocolate Cupcakes

Happy (early) St Patty’s Day!

I know, I know.

March is supposed to be about Leprechauns and turning everything green and pretending you’re Irish.

But I didn’t want a green cupcake. I didn’t want green frosting. I’m already Irish (remember those Guinness Spice Cakes?) so I went a complete different route.

I went for the pot of gold.


I went for caramel.

Ooey, gooey, SALTED caramel.
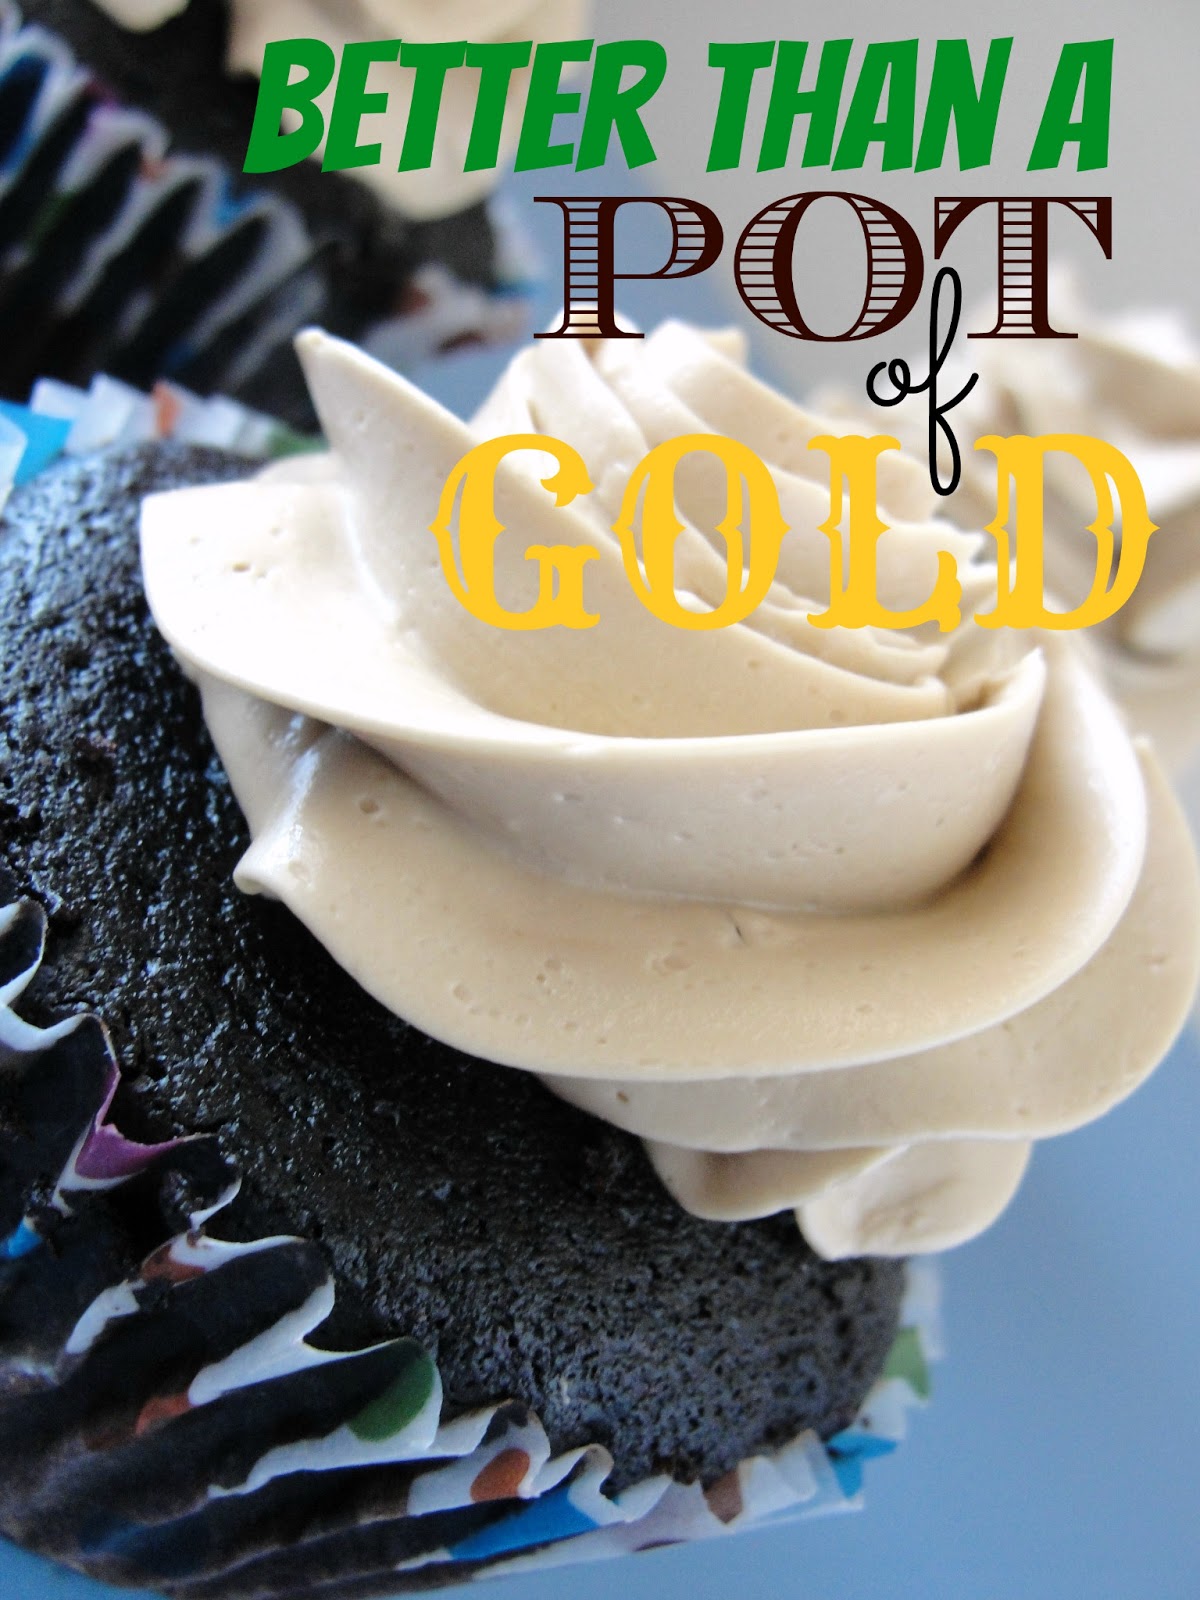
Inside a super moist chocolate cupcake.

Topped with the absolute best brown sugar Swiss meringue buttercream.


My biggest regret in this is that I did not take a picture of the inside. I always take a picture of my filled cakes. But with these cakes, a silly little problem kept happening…

I would take my picture. Grab a knife. Accidently touch the frosting. Go to lick the frosting from my finger. And end up devouring the whole cupcake.

Like seriously. Happened twice. Then I gave up.

So you have to take my word on how gooey this caramel is. It’s a touch thicker than store bought sauce, but not quite to the caramel chew stage.

I did have to thin this recipe out. I originally cooked it to the specifications. Then I let it sit overnight.

When I went to try it the next day, it was solid. Like cut it into cubes and wrap ‘em in wax paper solid. But so DELICIOUS! I would scoop a nibble and walk away.

Then I’d think of some reason to go check on it again. And take another scoop. And maybe that happened a few times.

Then I decided it would be too thick in a fluffy cupcake.

I don’t know if there is really a good way to reheat a homemade caramel. You might have experience with this. I mostly just make everything up and hope for the best.

Through careful deduction and thoughtful deliberation, it was determined that a double boiler would heat it slow enough that it would not burn the caramel. So I tried it.

It worked. Slowly. So slow that I had to help it along. I used my electric tea kettle to boil some water and added that to the caramel. In total I used about 3/4 of a cup of water, added one tablespoon at a time.

For the sake of full disclosure, let me add that while I didn’t notice it at the time (or even the next few days that I was scarfing down these cupcakes), I think the water additions caused the sugars to crystalize. I saved the extra sauce in a squeeze bottle (Hello Ice Cream!) and now it’s a bit grainy. Granted, it could be the sitting on the counter that did it. Or the slight reheating I would do to cover that ice cream.

But it’s no biggie to me. It’s still CRAZY GOOD!

Salted Caramel Sauce
(recipe from a Cake Central forum)

Ingredients:
1 cup (2 sticks) unsalted butter
2 cups dark brown sugar, packed firm
1 cup light corn syrup
1 can (14 oz) sweetened condensed milk
2 tablespoons heavy cream
2 teaspoon vanilla extract
1-2 teaspoons salt

1. Combine butter, sugar, corn syrup and condensed milk in a medium heavy bottomed sauce pan set over medium heat. Stir constantly.
2. Bring to a boil before adding cream. Attach a candy thermometer to the side of the pan. Remain stirring.
3. Allow caramel to reach 230 degrees. Remove from heat and stir in vanilla extract and half of the total amount of salt. (How much salt depends on your taste and the type of salt used. I used kosher salt. And I ended up using two heaping teaspoons. But I like salt.)
4. Pour caramel into a glass bowl. Allow to cool at room temperature. Taste the caramel. Add remaining salt and stir well. Cover tightly and store. If stored in the refrigerator, allow two to three hours to return to room temperature before filling any cupcakes. It can sit at room temperature for several days.

For the cupcakes pictured here, I baked my favorite scratch chocolate cake recipe and made this brown sugarbuttercream.
I used a size 100 disher to scoop out the middle of a cooled cupcake. (This did get messy and required a lot of quick washes about every 4 or 5 cupcakes.) I then used the same disher to scoop caramel into the hole created. Using a Wilton 1M tip, I piped a swirl of frosting on top to seal the caramel in.


So this Saint Patrick’s Day, make something to wash that icky green beer taste away. Besides, it’s all about the pot of gold anyways.

Sláinte!
bleu